How to Use a Router Table: Complete Beginner Guideow to Use a Router Table
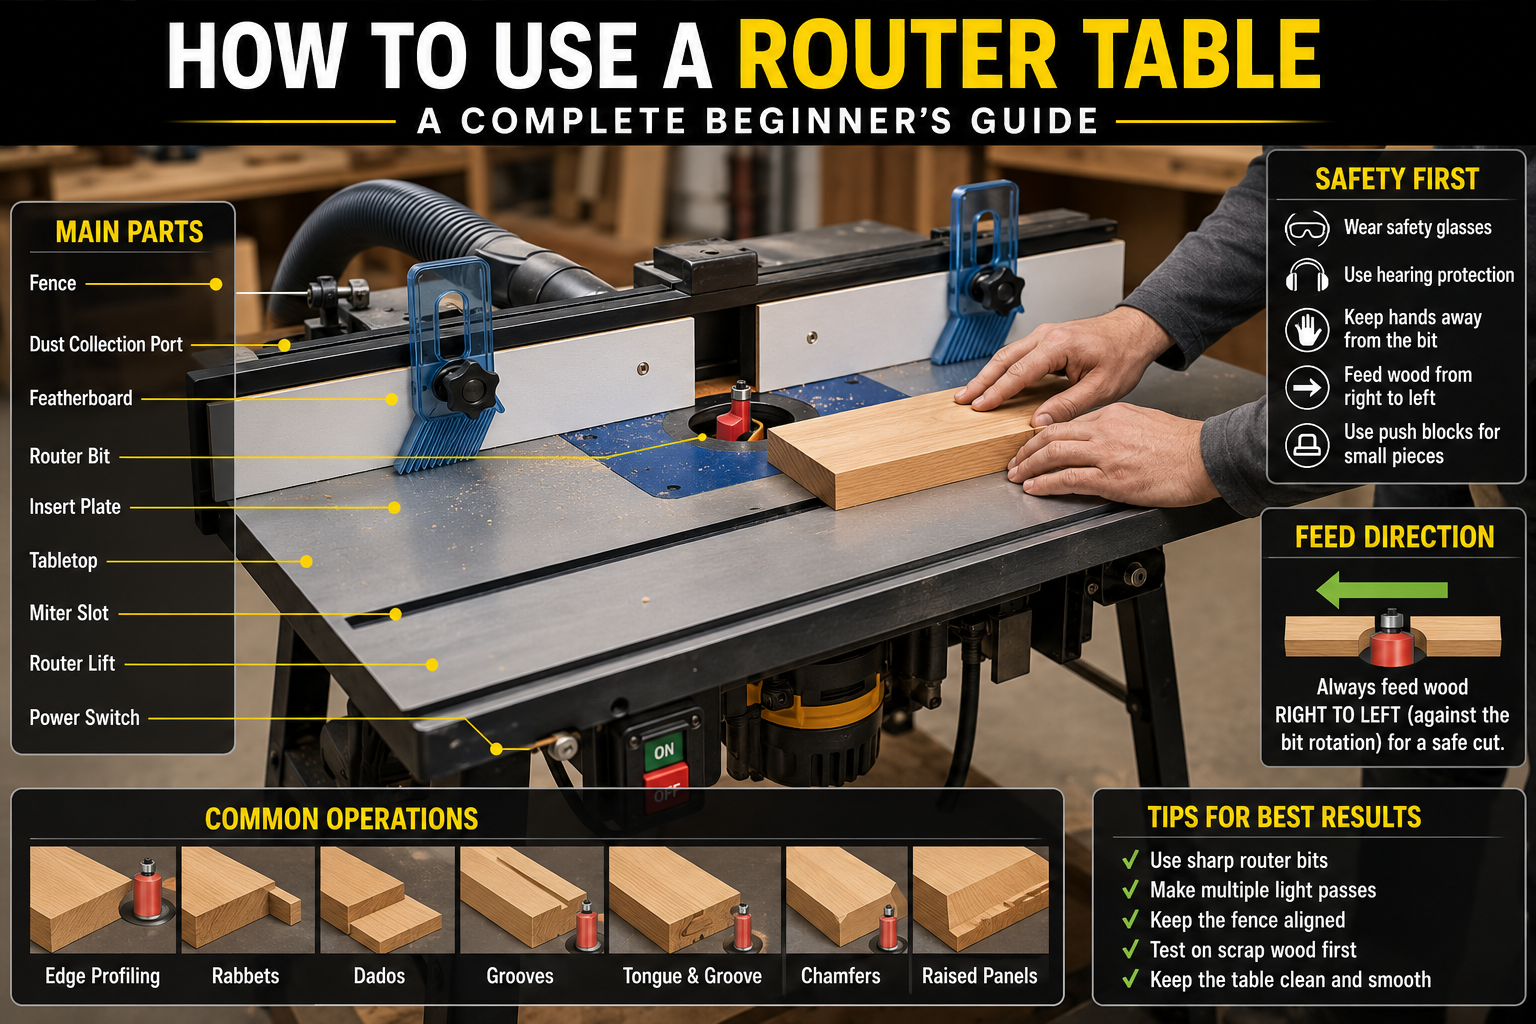
Table of Contents
ToggleHow to Use a Router Table: A Complete Beginner’s Guide
A router table is one of the most useful tools in any woodworking shop. While handheld routers are excellent for portability, mounting a router beneath a table transforms it into a precision machine capable of producing clean edges, perfect joinery, decorative profiles, and repeatable cuts.
Whether you’re making cabinets, shelves, furniture, picture frames, or decorative trim, learning how to use a router table correctly improves both accuracy and safety.
This guide explains everything from choosing the right router bit to setting fence positions, making safe cuts, avoiding common mistakes, and maintaining your equipment.
Table of Contents
- What Is a Router Table?
- How Does a Router Table Work?
- Main Parts of a Router Table
- Benefits of Using a Router Table
- Essential Safety Tips
- How to Set Up a Router Table
- Step-by-Step: How to Use a Router Table
- Common Router Table Operations
- Router Bits Explained
- Router Table vs Handheld Router
- Common Mistakes to Avoid
- Maintenance Tips
- Pros and Cons
- Frequently Asked Questions
- Conclusion
What Is a Router Table?
A router table is a woodworking workstation that holds a router upside down beneath a flat tabletop. Only the cutting bit extends through the surface, allowing the wood to move across the cutter instead of moving the router across the wood.
This setup offers:
- Better control
- Increased precision
- Cleaner edges
- Improved repeatability
- Safer handling of small workpieces
Router tables are commonly used in furniture making, cabinetry, trim work, and custom woodworking.
How Does a Router Table Work?
The router motor spins a cutting bit at extremely high speed—typically between 8,000 and 24,000 RPM.
Instead of guiding the router by hand, you guide the workpiece along a fence or bearing while the spinning bit removes material.
This produces smooth, consistent cuts with minimal effort.
Main Parts of a Router Table
| Component | Purpose |
|---|---|
| Tabletop | Supports the workpiece |
| Router Motor | Powers the cutting bit |
| Insert Plate | Holds the router underneath |
| Fence | Guides straight cuts |
| Featherboards | Hold stock securely |
| Miter Slot | Supports accessories |
| Dust Collection Port | Removes sawdust |
| Router Lift (optional) | Adjusts bit height precisely |
| Switch | Allows convenient power control |
Benefits of Using a Router Table
A router table offers several advantages over a handheld router.
Better Accuracy
The stationary router produces straighter, more repeatable cuts.
Improved Safety
Both hands remain on the workpiece rather than the router.
Easier Edge Profiling
Decorative edges become much easier and more consistent.
Excellent for Small Parts
Small pieces are easier to control than with a handheld router.
Repeatable Production
Ideal for making multiple identical parts.
Essential Safety Tips
Never skip safety procedures.
Wear Proper Safety Gear
Always use:
- Safety glasses
- Hearing protection
- Dust mask when needed
Check the Router Bit
Before use:
- Ensure it is sharp
- Tighten the collet securely
- Insert the bit correctly
Feed Against Bit Rotation
Always feed wood from right to left across the front of the router table.
Feeding in the opposite direction can cause dangerous kickback.
Use Push Blocks
For narrow workpieces:
- Push sticks
- Push pads
- Push blocks
These keep your hands away from the spinning cutter.
Make Multiple Light Passes
Avoid removing too much material at once.
Several shallow cuts produce:
- Cleaner finish
- Less burning
- Longer bit life
- Safer operation
How to Set Up a Router Table
Step 1: Install the Router Bit
Disconnect power first.
Insert the bit into the collet while leaving a small gap at the bottom before tightening.
Step 2: Adjust Bit Height
Raise the bit only as high as necessary.
Test the setup on scrap wood before cutting your project.
Step 3: Position the Fence
Align the fence with the cutting edge.
For edge routing:
- Fence should support both sides of the bit.
Step 4: Connect Dust Collection
Wood routers create large amounts of chips.
Using a dust extractor improves:
- Visibility
- Air quality
- Accuracy
Step 5: Perform a Test Cut
Always test:
- Bit height
- Fence position
- Feed direction
- Cutting quality
before using expensive lumber.
Step-by-Step: How to Use a Router Table
Step 1: Mark the Workpiece
Clearly identify:
- Start point
- Stop point
- Grain direction
Step 2: Turn On the Router
Allow the router to reach full speed.
Never begin cutting before full RPM.
Step 3: Feed the Wood
Move steadily against the cutter rotation.
Maintain even pressure against:
- Fence
- Table surface
Avoid forcing the wood.
Step 4: Complete the Cut
Continue feeding until the entire workpiece clears the bit.
Do not stop midway unless absolutely necessary.
Step 5: Turn Off the Router
Wait until the bit completely stops before removing scraps. Common Router Table Operations
Edge Profiling
Create decorative edges including:
- Round-over
- Chamfer
- Cove
- Ogee
- Bead
Common uses:
- Tabletops
- Shelves
- Cabinet doors
Grooves
Cut grooves for:
- Drawer bottoms
- Cabinet backs
- Sliding panels
Rabbets
Perfect for:
- Cabinet construction
- Picture frames
- Boxes
Dados
Useful when building:
- Bookshelves
- Cabinets
- Storage units
Tongue and Groove
Common for:
- Flooring
- Wall paneling
- Cabinet doors
Raised Panels
Essential for:
- Traditional cabinet doors
- Furniture panels
Router Bits Explained
Different bits perform different tasks.
| Router Bit | Best Use |
|---|---|
| Straight Bit | Grooves and dados |
| Flush Trim Bit | Copying templates |
| Round Over Bit | Rounded edges |
| Chamfer Bit | Angled edges |
| Cove Bit | Decorative profiles |
| Rabbeting Bit | Cabinet joints |
| Slot Cutter | Grooves |
| Dovetail Bit | Dovetail joints |
| Panel Raising Bit | Cabinet doors |
| Spiral Bit | Clean cuts |
Router Table vs Handheld Router
| Feature | Router Table | Handheld Router |
|---|---|---|
| Accuracy | Excellent | Good |
| Small Pieces | Excellent | Difficult |
| Large Panels | Limited | Excellent |
| Repeatability | Excellent | Moderate |
| Edge Work | Excellent | Good |
| Portability | Low | High |
| Precision Joinery | Excellent | Moderate |
Real-World Uses
A router table is commonly used for:
- Building kitchen cabinets
- Making furniture
- Crafting picture frames
- Creating moldings
- Building drawers
- Cutting joinery
- Decorative woodworking
- Professional cabinetry
Common Mistakes to Avoid
Feeding in the Wrong Direction
This is the most common beginner mistake.
Always feed against cutter rotation.
Removing Too Much Material
Heavy cuts increase:
- Burning
- Tear-out
- Kickback
- Bit wear
Ignoring Grain Direction
Routing against unfavorable grain may cause tear-out.
Inspect the wood before cutting.
Using Dull Bits
Sharp bits produce:
- Cleaner edges
- Less burning
- Safer cuts
Skipping Test Cuts
Every setup should be tested using scrap material first.
Maintenance Tips
Proper maintenance extends the life of your router table.
Regularly:
- Clean dust from the motor
- Lubricate moving parts if recommended by the manufacturer
- Inspect router bits
- Replace worn bearings
- Tighten fasteners
- Clean the tabletop
- Wax the table surface for smoother feeding
- Empty dust collection systems
Advantages and Limitations
Advantages
| Pros | Explanation |
|---|---|
| High precision | Excellent repeatability |
| Safer for small parts | Better workpiece control |
| Professional results | Smooth edges and joints |
| Large variety of cuts | Works with many router bits |
| Excellent finish quality | Reduces sanding |
Limitations
| Cons | Explanation |
|---|---|
| Initial cost | Router and table can be expensive |
| Requires setup time | Fence and bit adjustments are necessary |
| Limited portability | Best suited to a workshop |
| Learning curve | Beginners need practice |
| Dust production | Effective extraction is recommended |
Tips for Better Results
- Always use sharp router bits.
- Support long boards with extension tables or roller stands.
- Keep the tabletop clean and smooth.
- Use featherboards for consistent pressure.
- Make several shallow passes instead of one deep cut.
- Match router speed to the bit size; larger bits generally require lower speeds.
- Label frequently used bit settings for repeatable projects.
- Practice on scrap material before cutting finished workpieces.
Frequently Asked Questions
1. Is a router table better than a handheld router?
Neither is universally better. A router table excels at repeatable edge work, joinery, and small parts, while a handheld router is better for routing large panels, installed worktops, and projects that cannot be moved to the table.
2. Which direction should wood move on a router table?
For standard routing operations, feed the workpiece from right to left along the front of the router table so it moves against the bit’s rotation.
3. Can beginners use a router table?
Yes. Beginners can safely use a router table by following proper setup procedures, wearing protective equipment, and practicing on scrap wood before working on finished projects.
4. What is the best router bit for beginners?
A round-over bit, straight bit, and flush-trim bit are among the most versatile and beginner-friendly options because they cover many common woodworking tasks.
5. Why does my wood burn while routing?
Burn marks are usually caused by dull bits, feeding the workpiece too slowly, making overly deep cuts, or using an incorrect router speed for the bit size.
6. Do I need a router lift?
A router lift is optional. It simplifies above-table height adjustments and bit changes, making setup faster and more precise, especially for frequent use.
7. Can a router table cut dovetails?
Yes, but most dovetail work requires a compatible dovetail bit and a dedicated dovetail jig to achieve accurate, repeatable joints.
8. What wood can I use on a router table?
Router tables can machine most hardwoods, softwoods, plywood, MDF, and many composite wood products when paired with the appropriate router bit and cutting speed.
9. How often should router bits be replaced?
Replace or professionally sharpen router bits when they become dull, chipped, or begin producing rough cuts or excessive burning. The exact lifespan depends on the bit quality, material being cut, and frequency of use.
10. Is dust collection necessary?
While not strictly required, dust collection is strongly recommended. It improves visibility, keeps the workspace cleaner, helps protect your respiratory health, and can improve cut quality by clearing chips away from the bit.
Conclusion
Learning how to use a router table opens the door to more accurate, repeatable, and professional-quality woodworking. From shaping decorative edges to cutting precise joinery, a properly set up router table is a versatile addition to any workshop.
The key to success is careful preparation: install the correct bit, adjust the fence and bit height accurately, feed the workpiece against the bit’s rotation, and make multiple light passes instead of one aggressive cut. Combine these practices with regular maintenance and consistent safety habits, and you’ll achieve cleaner results while extending the life of both your router and cutting tools.
Whether you’re building cabinets, furniture, frames, or custom trim, mastering router table techniques will improve both the quality and efficiency of your woodworking projects.
About the Author